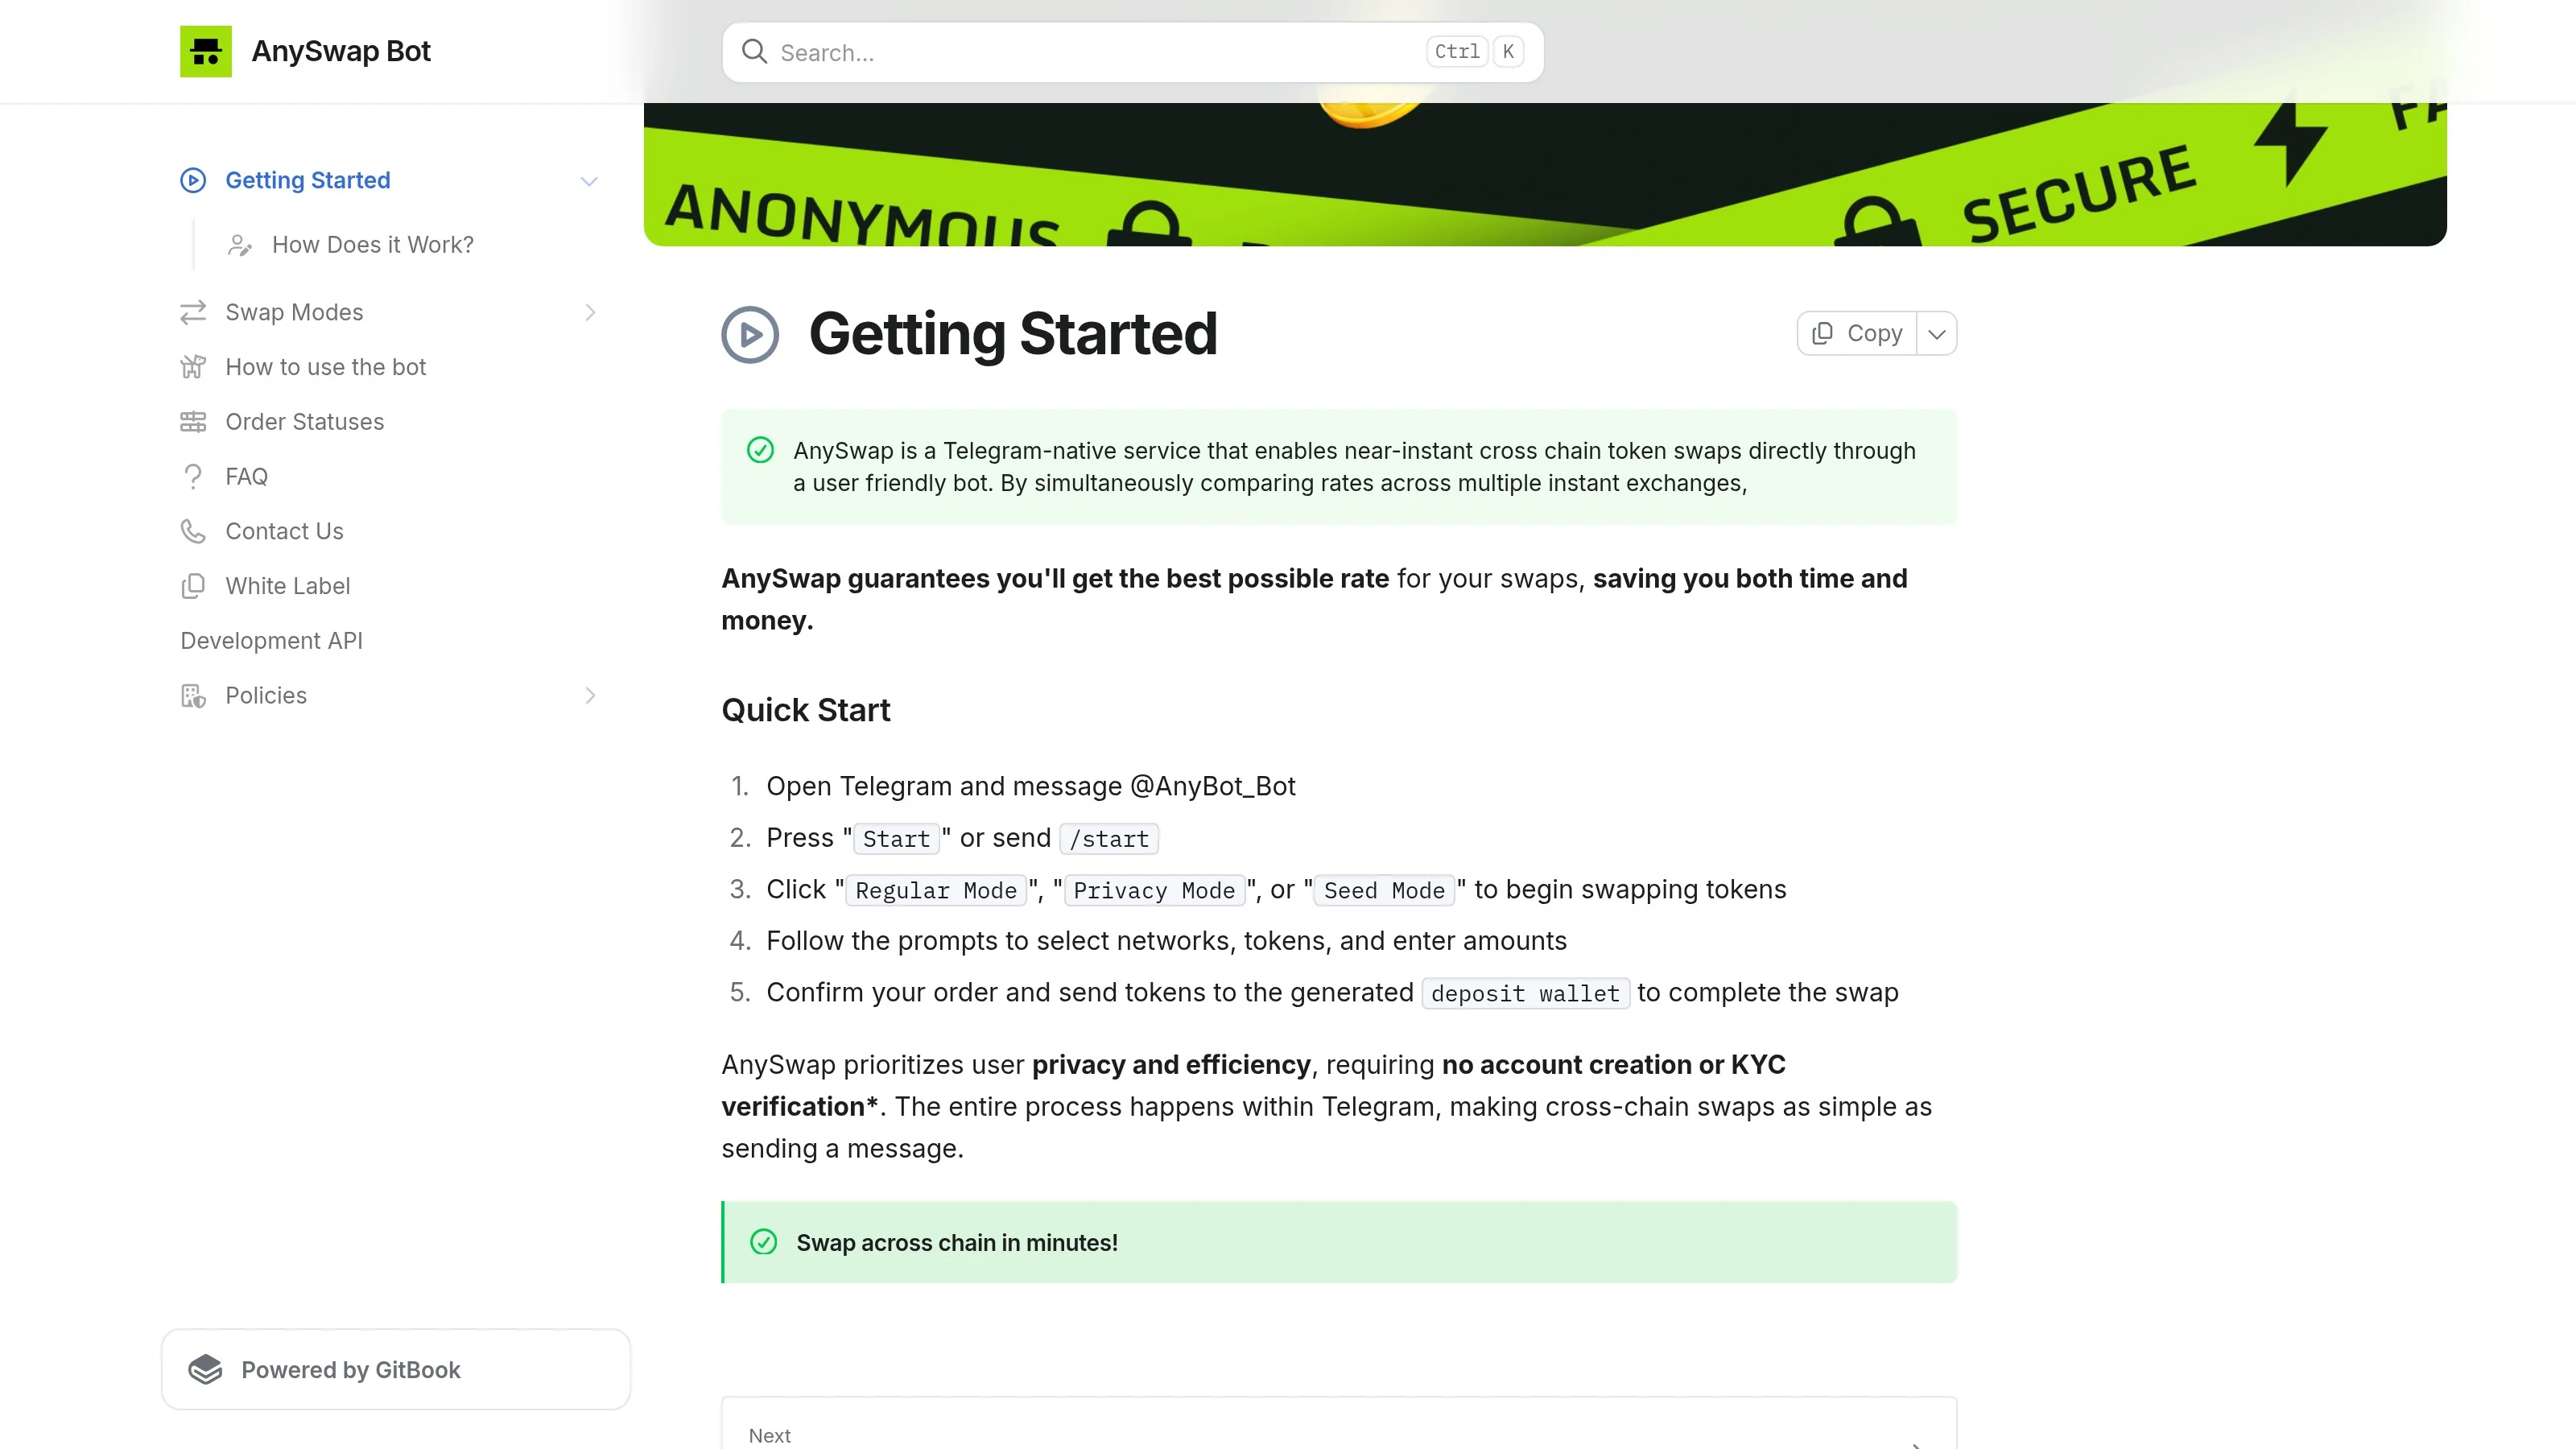
How to Use AnySwap: Step-by-Step Cross-Chain Swap (2026)
— By Tony Rabbit in Tutorials

AnySwap tutorial for 2026: choose a mode, set payout details, run your first cross-chain swap, track it, and avoid the most common first-swap mistakes.
Intent check: This page is the step-by-step AnySwap walkthrough. If you want the definition-first explainer covering modes, fees, and safety, read What Is AnySwap?.
Most people searching how to use AnySwap are already close to taking action. This page is the practical tutorial, not the broad product overview or the verdict page. If you want a step-by-step walkthrough for your first swap, this is the right URL.
Choose the right AnySwap page
- What Is AnySwap? for the broad overview
- How to Use AnySwap for the step-by-step tutorial
- AnySwap Review for the verdict, pros and cons
- AnySwap vs ChangeNOW and AnySwap vs FixedFloat for comparison intent
Before you start
Before opening AnySwap, make sure you know four things:
- What asset and network you are sending
- What asset and network you want to receive
- The exact destination wallet address
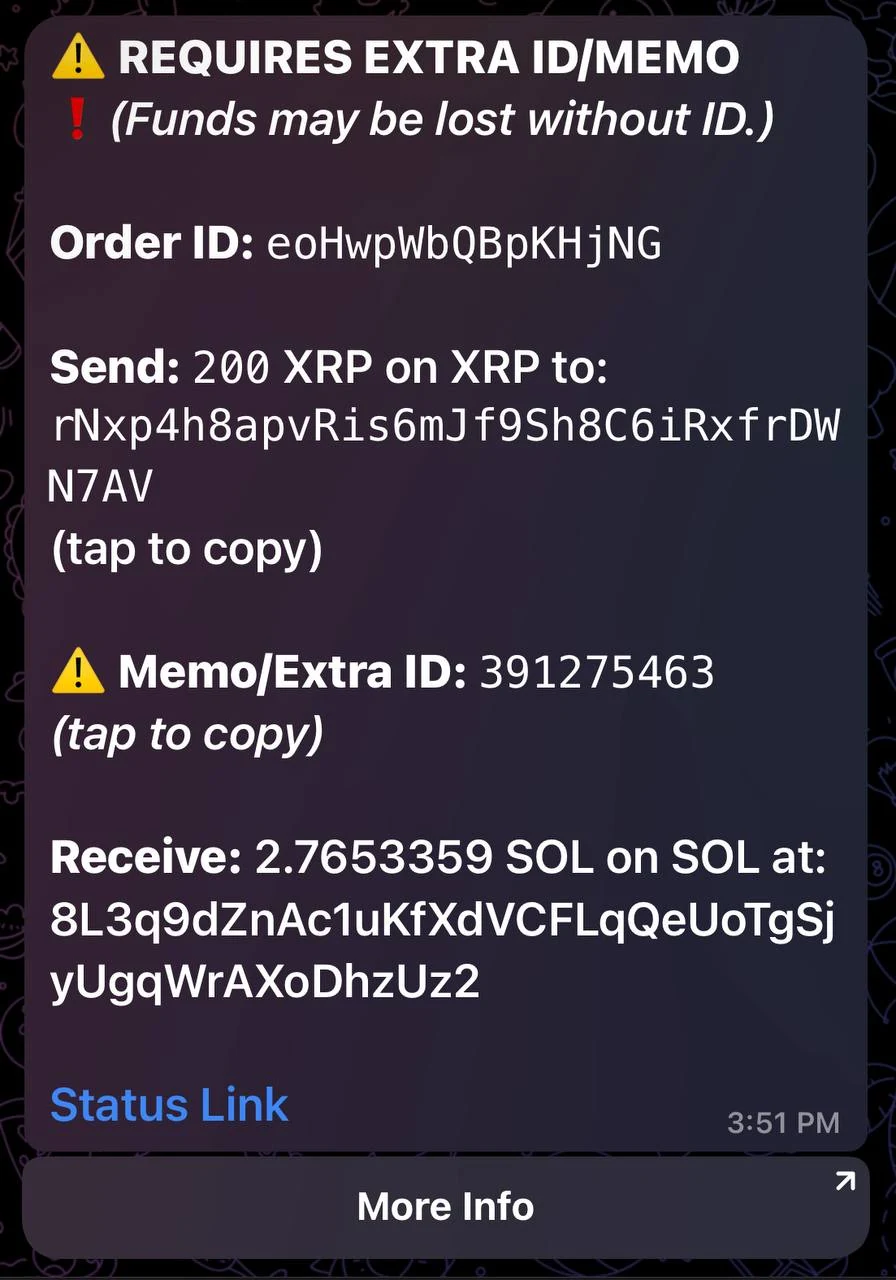
- Whether the destination chain requires a memo, tag, or extra ID
That last point matters more than most beginners expect. The live docs include a warning that orders requiring a memo or extra ID must include it in the transaction. If you skip that detail, a technically correct swap can still turn into a manual recovery problem.
A quick prep checklist:
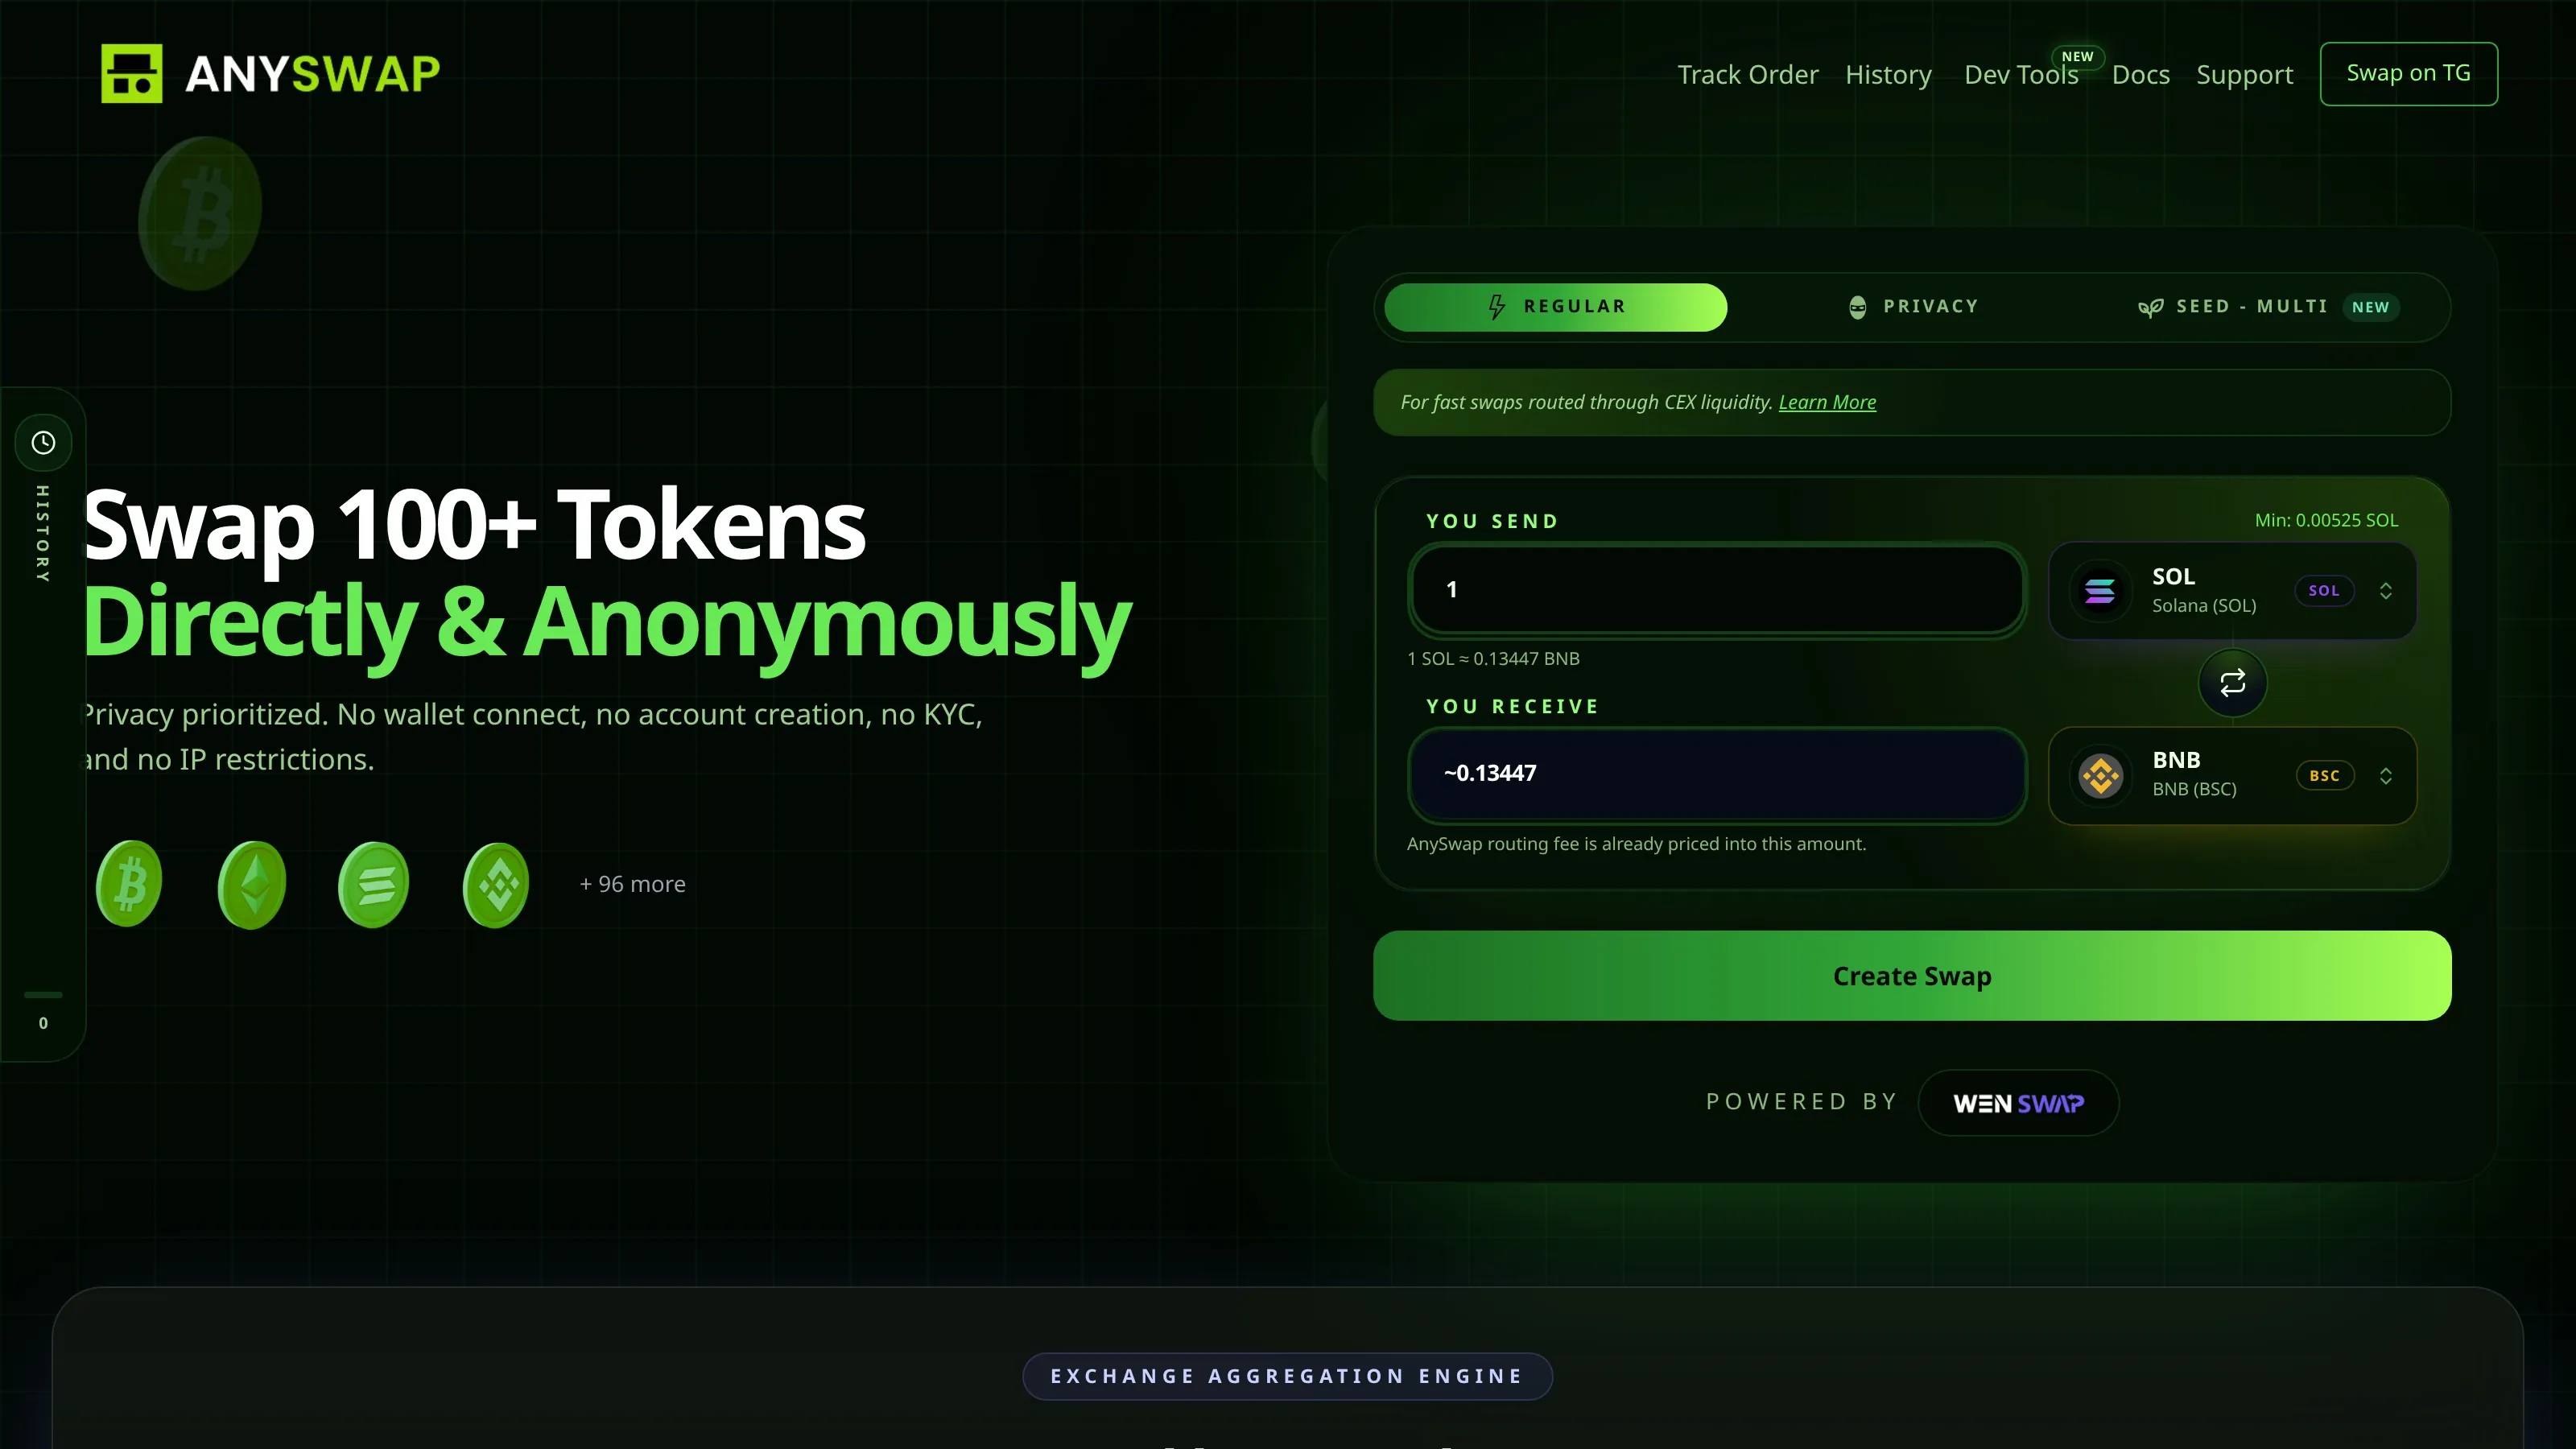
Step 1, choose Regular, Privacy or Seed Mode
This is the first real decision, and it changes everything after it.
When to use each mode
For a first-time user, Regular Mode is usually the easiest choice.
Use Privacy Mode if the reason you chose AnySwap in the first place is route privacy, especially when a plain one-hop swap would be too easy to connect onchain.
Use Seed Mode only if you actually need multi-wallet distribution. It is powerful, but it is not the best first order for a casual beginner.

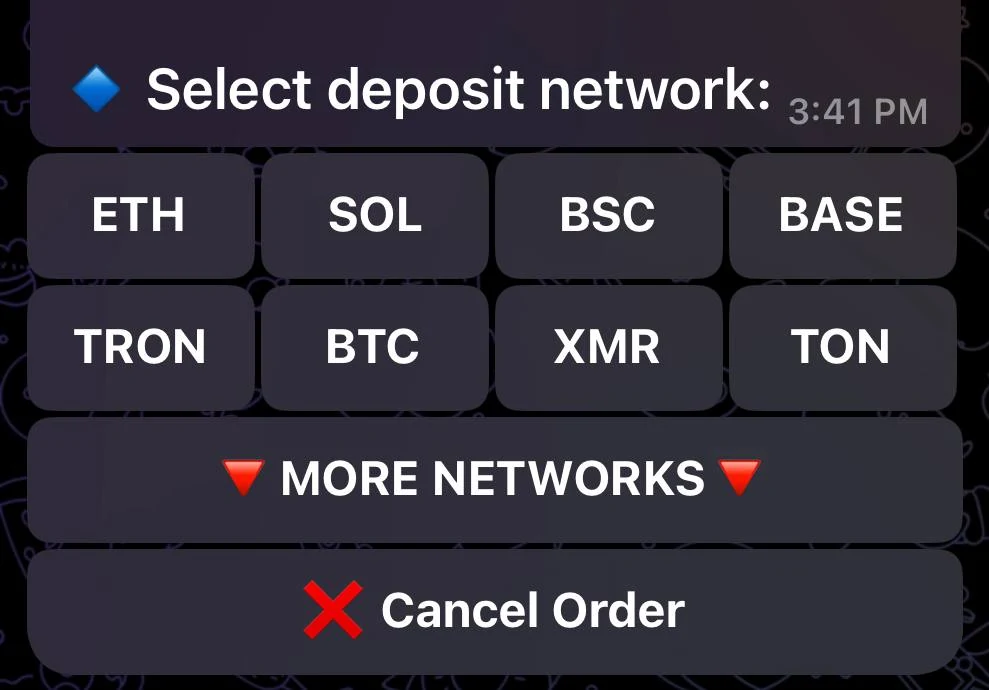
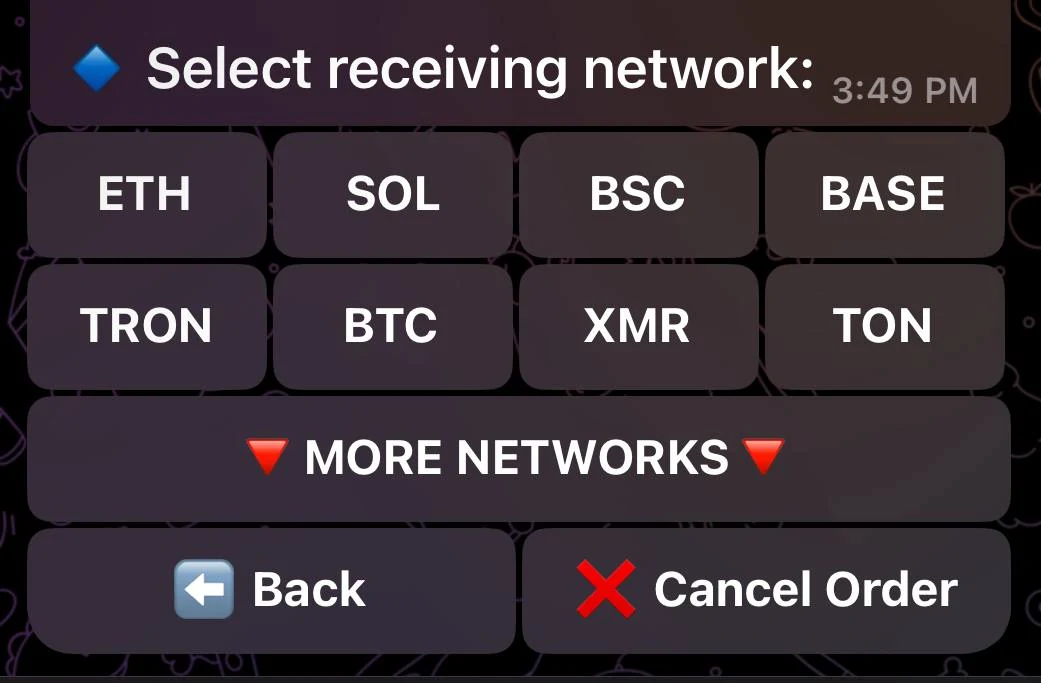
Step 2, select the deposit network and token
This step sounds obvious, but it is where many swap errors begin.
You need to choose:
- the network you are sending from
- the token you are sending
Do not assume a token name alone is enough. The network matters just as much as the asset. A good habit here is to pause for five seconds and confirm the pair out loud to yourself before moving on.
If you are sending from an exchange instead of a self-custody wallet, double-check that the exchange can send on the exact required network.
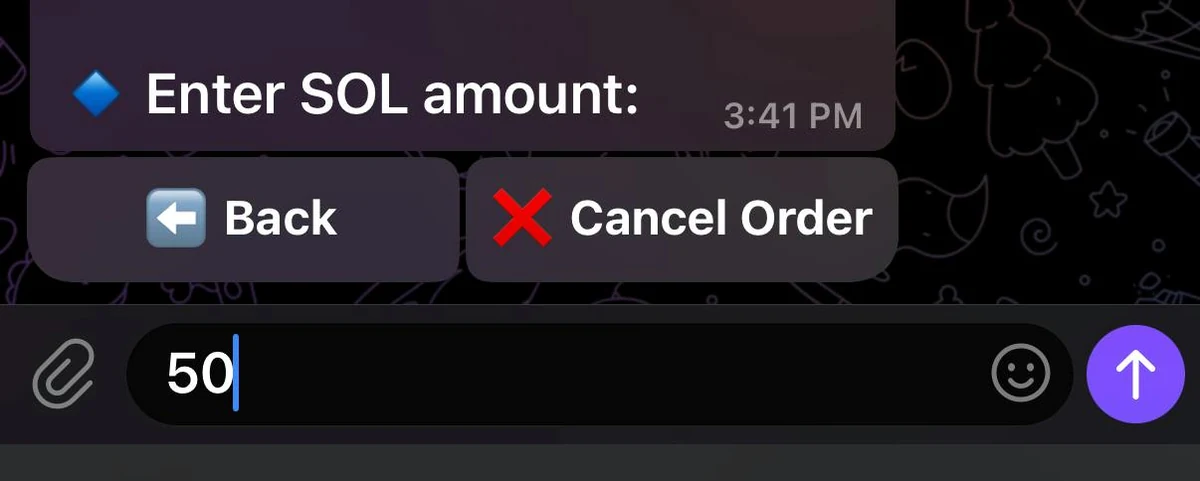
Step 3, enter the amount
Now enter the amount you want to swap.
AnySwap's FAQ says minimums vary by token and network, but usually range from about $3 to $50 equivalent. It also suggests not exceeding around $25,000 per swap without checking specifics.
A few practical tips matter here:
- For a first test, start smaller than you think you need to.
- If your amount is near the minimum, be extra careful, because small network fee differences can matter more.
- In Seed Mode, remember you are entering the total amount, not the amount per wallet.
The FAQ also includes a useful rule that many users do not know:
- if you send too much, the swap processes at the higher amount
- if you send too little, the swap processes at the lower amount
That is helpful, but it should not be treated as permission to be sloppy. Exact amounts are still best, especially when a mode or a chain has tighter constraints.
Step 4, choose the withdrawal network and token
This is where you define what you want to receive.
You now choose:
- the destination network
- the destination token
This is the opposite side of the swap: the deposit side is what you are giving, and the withdrawal side is what you are getting. This is also where you should sanity-check whether Regular Mode is enough or whether you actually wanted Privacy or Seed Mode for a more specialized workflow.
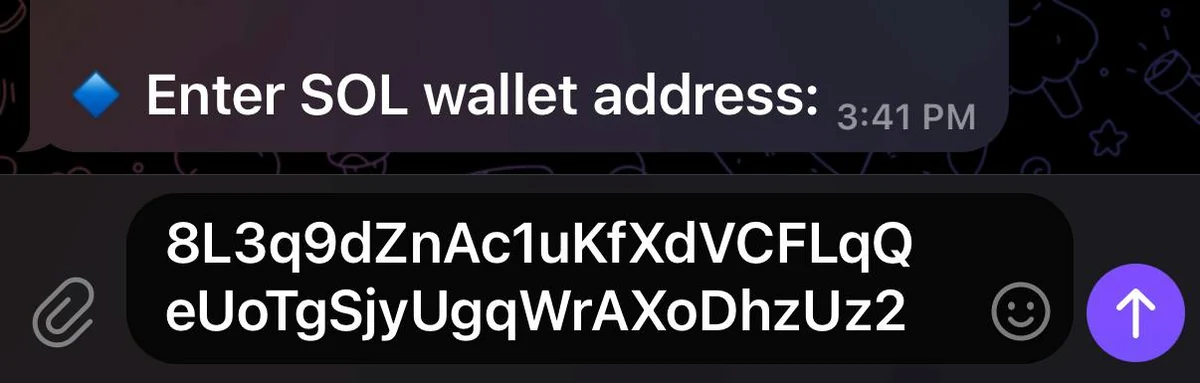
Step 5, enter the destination wallet
This is the most important field in the entire flow.
If the destination wallet is wrong, every other step can be perfect and the result can still be bad. Before confirming, verify:
- the address is copied completely
- it belongs to the destination network you selected
- any required memo, destination tag, or extra ID is also present
Seed Mode note for multiple wallet addresses
If you are using Seed Mode, this step changes. The docs say you should paste each recipient address on its own line. You will also choose a variance percentage, which controls how evenly or unevenly the total amount is split.
A simple way to think about Seed variance:
The docs warn that high variance with less than about $50 per order can cause issues. That warning should stay in the article because it is practical and specific.
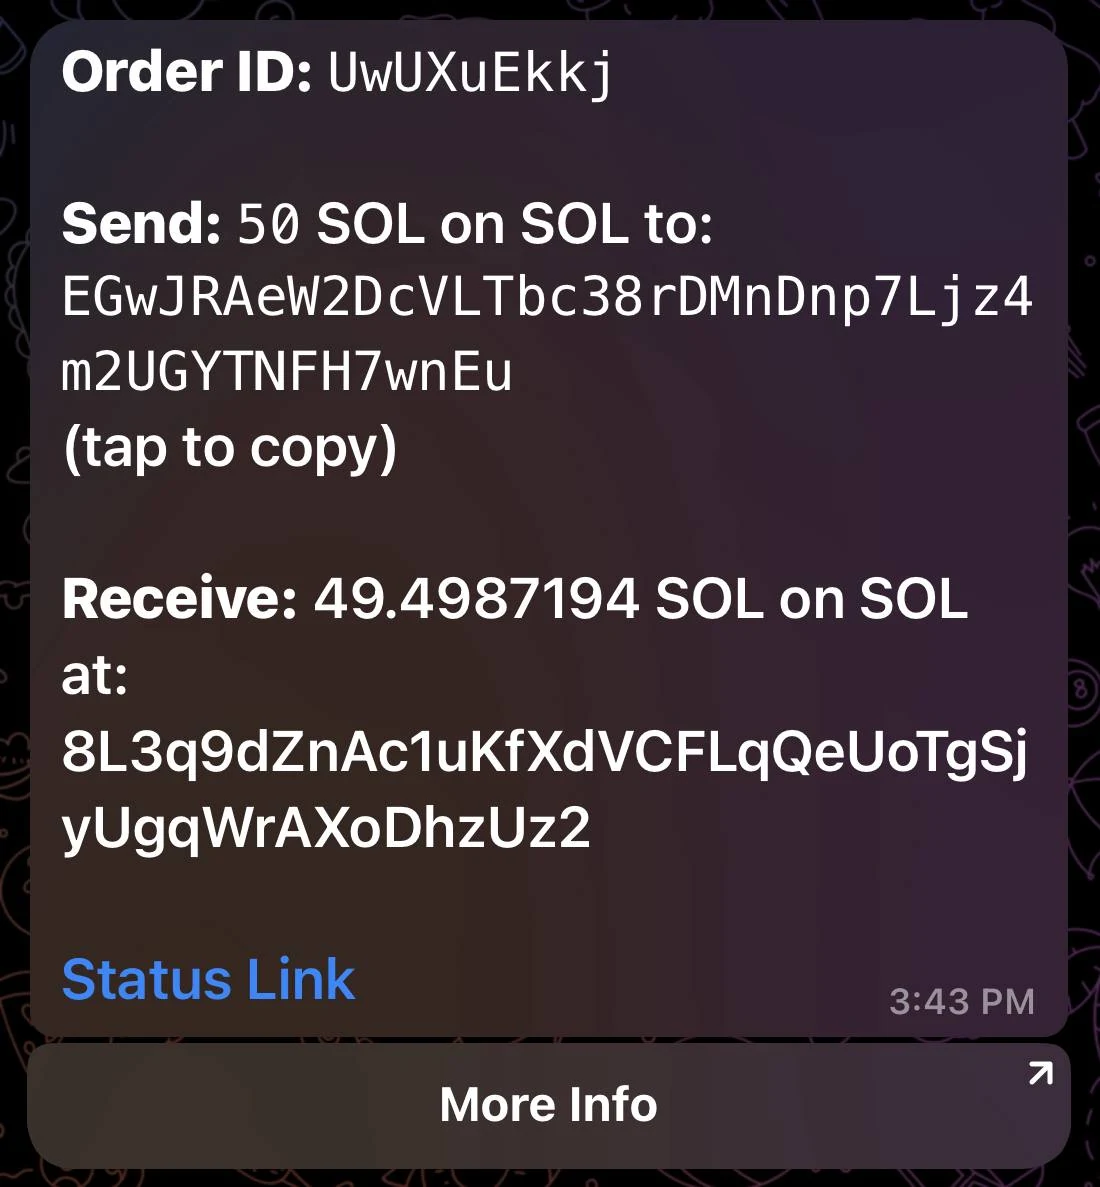
Step 6, confirm the order and send funds
Once the order summary looks right, AnySwap generates a deposit wallet. Now you send funds to that address from your wallet or exchange.
Before pressing send, confirm all of the following one last time:
- deposit asset is correct
- deposit network is correct
- amount is correct
- destination wallet is correct
- memo or tag is included if required
- you are not sending after the order has already expired
Why you should double-check memo fields and networks
Most catastrophic swap mistakes are not caused by a broken provider. They are caused by users sending the right asset on the wrong network, or the right address without the required memo.
The AnySwap docs explicitly warn that memo-required orders must include the memo. If you are sending from a centralized exchange withdrawal page, look especially carefully, because some exchange UIs bury memo fields under dropdowns or secondary steps.
Can you cancel after sending?
According to the FAQ, once funds are sent, a swap cannot be cancelled. If funds have not been sent yet, you can cancel the order or simply let it expire.
That means the best habit is to treat the confirmation screen like a pre-flight checklist, not like a formality.
Step 7, track the order status
Once funds are sent, the Order Statuses page becomes your main reference.
Order Created
This means the order exists, but funds have not yet been processed. If you are still at this stage, make sure you sent the funds to the generated address and that the transfer is on the correct network.
Processing
This means your payment was received and the swap is underway. According to the docs, this includes waiting for blockchain confirmations and executing the exchange.
Anonymizing / Seeding
This status appears only for Privacy Mode or Seed Mode. It means the funds are moving through the extra routing steps that make those modes different.
Do not panic if this stage takes longer than a standard swap. That is the point of the mode.
Finished or expired
Finished means the payout was sent to your receiving wallet.
Expired means payment was not received in time. If you send funds after expiration, the docs say you should contact support and include your Order ID.

Common mistakes and troubleshooting
Sent too much or too little
The FAQ says the order will process at the higher or lower amount rather than the exact originally entered number. That is useful, but if the amount difference is large or the route behaves unexpectedly, contact support with the order ID.
Order is taking longer than expected
AnySwap's published timing ranges are:
- 1 to 12 minutes for Regular Mode
- 3 to 15 minutes for Privacy Mode
- 5 to 30 minutes for Seed Mode
If your order goes well beyond those windows, the docs recommend contacting support inside the Telegram channel and providing your order ID.
Funds sent after expiration
Do not create a new order immediately and hope it magically matches. Start by contacting support with the expired order ID and the transaction details.
Wrong memo or missing extra ID
This is one of the most likely reasons a transfer needs manual review. If you realize the issue after sending, gather the transaction hash and order ID first, then contact support.
Wrong network selected
This is the highest-risk mistake in the entire process. Prevention matters more than recovery. Double-check before sending.
When to use Privacy or Seed Mode instead of Regular Mode
Regular Mode is the right default for most first-time users. But there are situations where the specialized modes make more sense.
Use Privacy Mode when:
- you want the swap path to be harder to link onchain
- you are doing a same-chain or obvious route and want extra separation
- you accept higher fees and slightly longer timing for that added routing behavior
Use Seed Mode when:
- you need to fund multiple wallets in one process
- you want to randomize the amounts distributed to each wallet
- you understand the variance setting and are not working with tiny per-wallet outputs
If you do not have a specific reason for using those modes, stay with Regular Mode for your first order.
Final take
Using AnySwap is straightforward once you respect the parts that deserve extra attention. The sequence itself is simple: choose the right mode, select the correct networks and tokens, enter the right wallet details, send the funds, and track the order until it finishes.
The real skill is not clicking through the steps. It is slowing down at the fields that can cause trouble, especially network choice, destination wallet, memo requirements, and expiration timing.
That is also why AnySwap can make a strong first impression. The workflow is not hard. It just rewards careful users, and that focused, low-friction flow is one of the main reasons it stands out from bulkier alternatives.
Related reading
Disclaimer: This article is for educational purposes only and does not constitute investment, financial, legal, or tax advice. Swap routes, fees, timing, and compliance checks can change. Always verify the live network, wallet, destination asset, and any memo or destination-tag requirement before sending funds.
Related Guides
- What Is an Atomic Swap? How Cross-Chain Swaps Work
- How to Use Rango Exchange: Multi-Chain Swap Guide (2026)
- Base Chain dApp Guide: Bridge, Swap, Lend and Use Base App (2026)
- Wormhole vs LayerZero: Cross-Chain Messaging Compared 2026
- What Is THORChain: RUNE Cross-Chain Bitcoin DEX Guide 2026
Frequently Asked Questions
How do I start an AnySwap order?
Open the current product flow, choose an order type, select the deposit network and asset, enter the amount, choose the withdrawal network and asset, and add the receiving wallet.
Which AnySwap mode should I choose?
Use Regular Mode for most first swaps. Use Privacy Mode if extra routing privacy is the main goal. Use Seed Mode if you need to distribute one deposit across multiple wallets.
What if I send the wrong amount?
According to the FAQ, the swap usually processes at the higher or lower amount actually received. If the difference is significant or the order behaves unexpectedly, contact support with the order ID.
Can I cancel an AnySwap order?
Yes, if you have not sent funds yet. Once funds are sent, the FAQ says the swap cannot be cancelled.
How do I track my AnySwap status?
Use the order status updates. The public docs explain statuses such as Order Created, Processing, Anonymizing or Seeding, Finished, and Expired.
What if the transaction needs a memo?
Include it. The docs explicitly warn that orders requiring a memo or extra ID must have it in the transaction.
When should I use Privacy Mode instead of Regular Mode?
Use Privacy Mode when you want a more privacy-oriented route and accept extra routing time and cost.
What is Seed Mode for?
Seed Mode is for splitting one deposit across multiple destination wallets, optionally with uneven distribution using the variance setting.