How to Use 1inch for Swaps: Classic, Fusion and Limit Orders (2026)
— By Tony Rabbit in Tutorials

Learn how to use 1inch for swaps in 2026, including when to choose Classic, Fusion, or Limit Orders, how routing affects execution, and which mistakes waste money.
Intent check: This page is the practical execution guide for 1inch swaps. If you want the explainer for Pathfinder, Fusion, and the 1inch protocol itself, read 1inch Explained.
1inch is most useful when you stop thinking of it as "just another swap page" and start using it like a routing tool. Its job is to search across liquidity sources, compare routes, and help you execute a swap more efficiently than you might get on a single DEX alone. That does not mean every trade will be perfect. It means 1inch can give you a smarter starting point, especially when slippage, gas, and route quality actually matter.
For beginners, the practical mistake is usually not clicking the wrong button. It is using the wrong trading mode for the job, or assuming an aggregator makes a bad token safe. It does not. A cleaner approach is to slow down, verify the token and the chain, choose the right mode, and then review price impact, gas, and execution before signing anything.
Quick answer
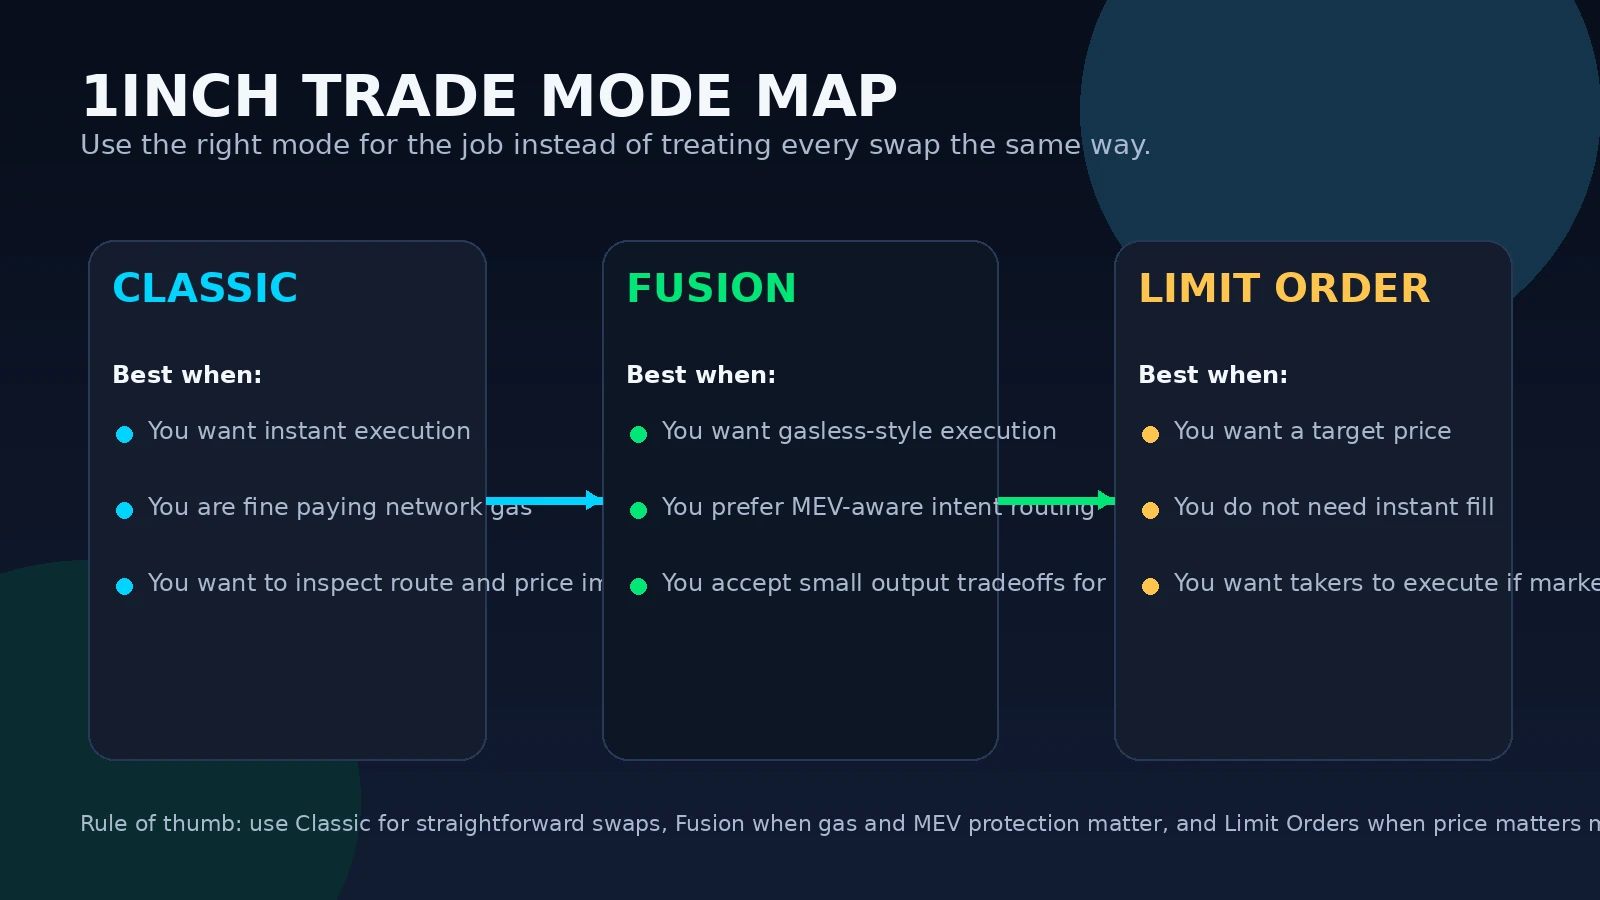
- Use Classic when you want a straightforward market swap and you are comfortable paying normal network gas.
- Use Fusion when you want 1inch's intent-based flow, MEV-aware execution, and a swap flow that usually does not require you to pay gas in the same way as a classic onchain swap.
- Use Limit Orders when price matters more than immediate execution.
- Always verify the token contract, review price impact, and keep your slippage settings under control before signing.
What 1inch Actually Does
1inch is a DEX aggregator. In plain English, that means it searches multiple liquidity sources and tries to build a better execution path for your trade. According to 1inch, this can include routing through different DEXes, splitting a trade across more than one source, and optimizing execution to reduce unnecessary price impact.
That matters because a direct swap on a single DEX only sees the liquidity available in that one place. If the pool is thin, your trade can move the market harder than expected. An aggregator can sometimes reduce that damage by routing more intelligently. It is not magic, and it is not a promise of the best possible trade in every market, but it is usually a better workflow than blindly swapping on the first interface you open.
Step 1: Connect the Wallet and Confirm the Chain
Start from the official 1inch interface and connect the wallet you actually intend to use. Then confirm the network before you even look at the quote. This sounds basic, but a surprising number of bad swaps start with a wallet on the wrong chain or a user who assumes an asset is already sitting where they need it to be.
1inch's help center notes that you can custom add tokens if they do not appear in the selector, but this is exactly where beginners get into trouble. If the token is not obvious and established, verify the contract address first and do not rely on a ticker alone. The aggregator can help route a swap, but it cannot protect you from swapping into the wrong contract.
Step 2: Pick the Right 1inch Mode
One of the biggest improvements you can make on 1inch is to stop using every trade the same way.
Step 3: Make a Better First Swap
A clean first swap on 1inch should be boring. Pick a familiar pair, use a small size, and read the quote screen instead of rushing to sign. The key fields to review are the route, estimated output, price impact, network, and any gas implications of the mode you chose.
If you are using Classic mode, keep enough native gas in the wallet to cover both approval and swap if needed. If you are using Fusion for the first time, 1inch says you may still need native tokens to grant smart contract permissions before the gasless-style flow takes over. In other words, do not show up with an empty wallet and expect every step to work automatically.
It also helps to think in sequence:
How Fees Work on 1inch
This is one of the places where beginners get confused because they hear "gasless" and assume there are no costs at all. 1inch's own help documentation is more nuanced than that.
According to 1inch, swaps in the Pro interface using the DEX aggregator involve normal blockchain gas fees paid by the user. In the Swap interface, costs are often covered by resolvers in the intent-based flow, but some swaps can still involve user-paid gas, especially depending on network, token type, or route. The practical takeaway is simple: always review the final output and cost context on the actual quote screen. Focus on what you receive, not on marketing shorthand.
How to Use Limit Orders More Intelligently
Limit Orders are often underused by beginners, but they are one of the easiest ways to avoid chasing price. If you already know the level where you want to buy or sell, a limit order lets you define the trade first and let the market come to you.
1inch describes its limit order flow as offchain order creation that can be filled by takers when market conditions match your price. That means the order may sit there unfilled if the market never reaches your level, which is not a bug. It is the cost of demanding price discipline instead of instant execution.
A good beginner use case is simple: if you know you only want to buy a token after a pullback, place the order and walk away instead of impulsively market buying after a green candle.
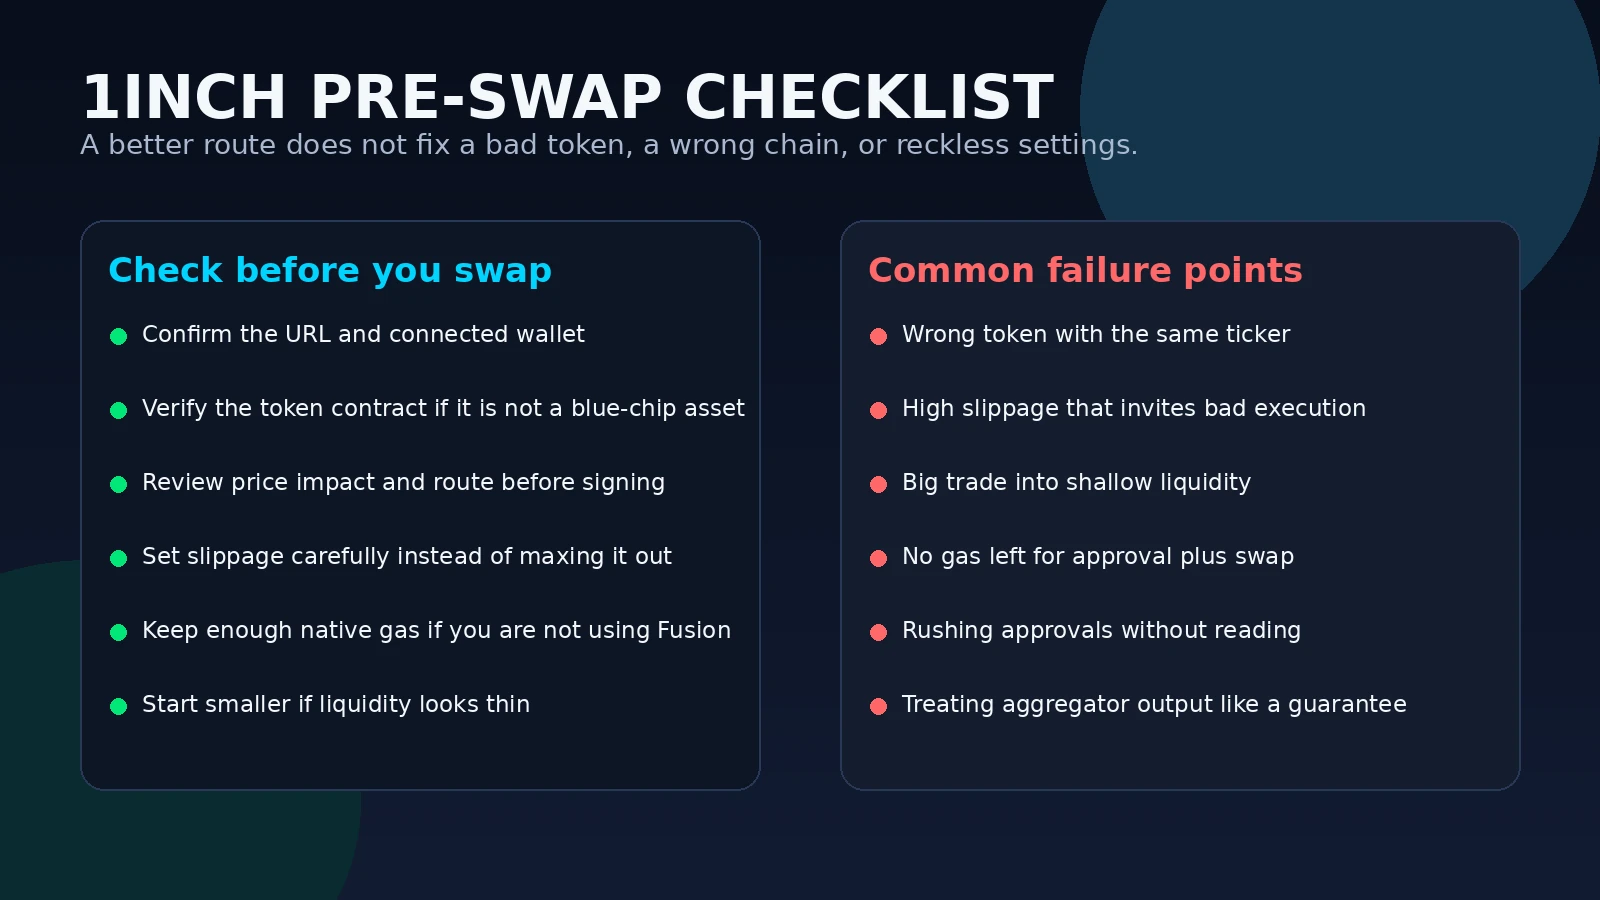
Common 1inch Mistakes That Cost People Money
A Safer 1inch Workflow for Beginners
If you want one practical workflow to follow, use this:
1inch beginner checklist
- Confirm you are on the correct chain and on the real 1inch interface.
- Verify the token contract if the asset is not obvious.
- Choose the mode deliberately: Classic, Fusion, or Limit Order.
- Review route quality, price impact, and received amount before signing.
- Keep enough native gas if the trade path requires approvals or normal execution.
- Use smaller size first when liquidity looks thin or the token is new to you.
This is the kind of routine that actually saves money over time. Not because it looks sophisticated, but because it removes the careless mistakes that cost more than any routing improvement can save.
Frequently Asked Questions
Is 1inch a DEX?
It is better understood as a DEX aggregator. Its role is to search and route across liquidity sources rather than acting like a single isolated pool.
Do I always avoid gas fees on 1inch?
No. 1inch says some intent-based swap flows shift execution costs away from the user, but Classic swaps and some other cases still involve normal gas costs.
What is 1inch Fusion in simple terms?
Fusion is 1inch's intent-based swap flow where resolvers compete to fill your order and cover execution costs, with MEV-aware design as part of the pitch.
Why would I use a limit order on 1inch?
Use it when you care more about a target price than instant execution. The order may stay unfilled if the market never reaches your level.
Is 1inch enough to make a risky token safe?
No. Better routing does not replace contract verification, liquidity checks, or sensible position sizing.
Related reading
Source basis: official 1inch website and 1inch help center materials covering aggregation routing, Fusion, slippage tolerance, getting started with swaps, fees, and limit orders. This article is educational only and does not constitute investment, legal, tax, or financial advice.
Related Guides
- 1inch Explained: Pathfinder, Fusion and How the DEX Aggregator Works (2026)
- What Is a DEX Aggregator: Complete Guide to 1inch, Jupiter and ParaSwap (2026)
- How to Use Jupiter DEX on Solana: Complete Swap, Limit Order and DCA Tutorial (2026)
- How to Use Raydium on Solana: Swaps, Liquidity Pools and CLMM Guide (2026)
- Stop-Limit vs Stop-Market Orders: Crypto Guide 2026