How to Use Orbiter Finance Bridge: Tutorial (2026)
— By Tony Rabbit in Tutorials

Learn how to bridge crypto with Orbiter Finance across L2s fast and cheap. A step-by-step 2026 tutorial covering fees, supported chains and safety.
Orbiter Finance is a strong search target because it solves a very practical user problem: moving assets between rollups and adjacent networks without forcing users into a bloated bridge experience. That practicality shows up right in its positioning. Orbiter describes itself as a bridge and swap product built for cross-rollup transactions, with an emphasis on speed, cost efficiency, and broad network support.
That does not mean the product is foolproof. It means the product is designed for a cleaner job. Users still need to choose the correct route, understand what they are sending, and verify the bridge is finished on the other side. The bridge can be fast and still punish lazy route selection.
Quick answer
- Choose the from and to chains before thinking about amount or speed.
- Keep enough gas on both networks so the arrival side is actually usable.
- If something looks wrong, use History and support details instead of guessing.
What Orbiter Finance Is Best Used For
Orbiter is strongest when you need a straightforward L2-to-L2 or cross-rollup move and you care about speed, compatibility, and a cleaner route than a generic bridge directory gives you. The docs emphasize that Orbiter supports a wide range of networks and frames the product around fast, trustless, and cost-efficient cross-rollup transfers.
That matters because users bridging between layer-2 ecosystems often do not need another huge essay about what a bridge is. They need to know whether the route is supported, how fast it is likely to settle, and what operational details still matter on the destination side. Orbiter is good for that exact workflow.
When Orbiter makes the most sense
What to Prepare Before You Use Orbiter
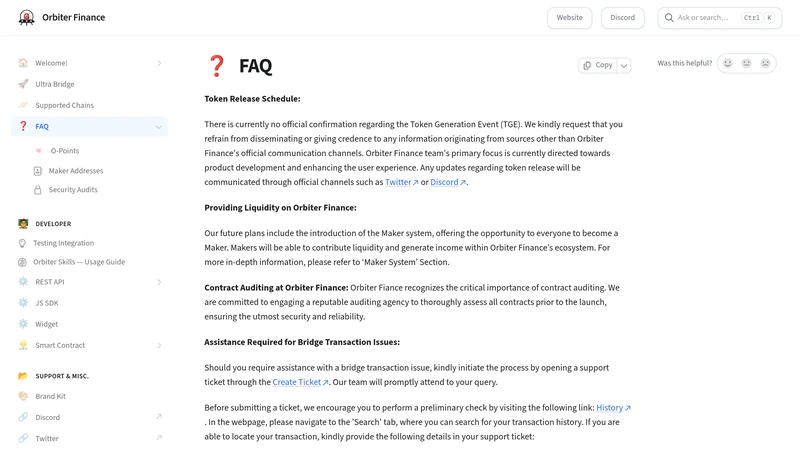
The setup is simple: know the source chain, know the destination chain, know the asset, and make sure your wallet is ready for both environments. The Orbiter docs also make an underrated troubleshooting point in the FAQ: if something goes wrong, History and structured support details matter. That tells you a lot about how the product expects users to operate. Good bridging is not just route selection. It is route documentation too.
The four choices that decide whether an Orbiter bridge feels easy
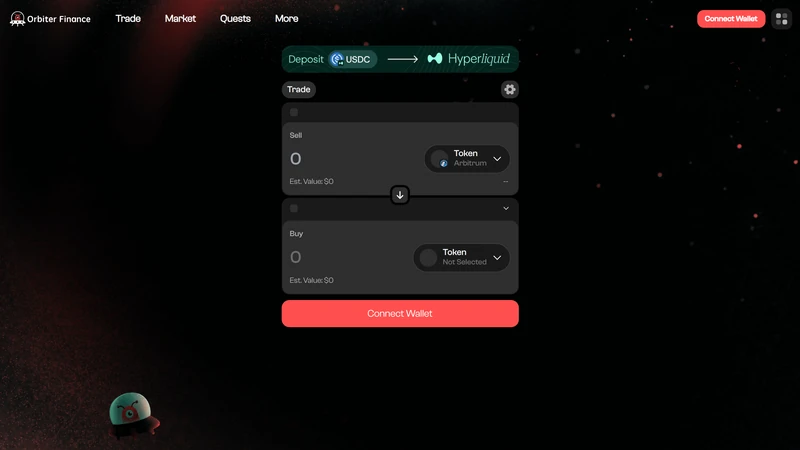
How to Use Orbiter Finance Step by Step
Start by connecting the wallet and building the route from the source chain to the destination chain. Orbiter’s product strength is that the interface makes the route feel direct, but you should still review it as if you were wiring money. Confirm the networks, asset, amount, and destination usefulness before approving the transaction.
Once the route is submitted, give the bridge time to do its job instead of reacting emotionally to every short delay. The docs market Orbiter as fast, and that may often be true, but “fast” is not the same thing as “instant in every condition.” A better user habit is to verify the route and then monitor it calmly through history and wallet visibility.
A safer Orbiter workflow
Fees, Speed, and Route Quality
Orbiter is often chosen because users want a route that feels cleaner and faster than a generic bridge experience. That is valid, but it helps to translate “fast” into something operational. The route that feels fastest on paper is not automatically the best route if it lands on the wrong chain for your next action or leaves you with awkward leftover gas and token balances.
The better way to judge Orbiter is to look at the whole route quality. How much are you really paying to leave the source chain? Will the destination funds be usable immediately? Is the time saving meaningful compared with an alternative path? Good users think about speed and cost together, not as separate bragging rights.
How to judge an Orbiter route
What to Check After Funds Arrive
Users often relax too early once the bridge stops looking active. The better habit is to treat arrival as its own checklist. Are you on the correct destination chain? Are you looking at the right token representation? Does the wallet show the exact asset you expected? Can you actually do the next thing you planned to do, such as swapping, staking, or bridging again?
This is where a lot of bridge anxiety gets resolved. What looks like a failed transfer can sometimes be a visibility issue, a chain-selection issue, or just a mismatch between what the user thought would arrive and what the route actually produced. Checking those basics first is much more productive than jumping straight into panic mode.
Common Orbiter Mistakes to Avoid
Users usually do not break Orbiter by doing something sophisticated. They break the experience by rushing. They choose the wrong destination chain, forget to think about destination gas, or treat history and transaction documentation as optional until something looks off.
Mistakes that make a simple bridge feel complicated
How to Troubleshoot an Orbiter Transfer
Start by checking whether the transfer appears in History. Orbiter’s FAQ specifically directs users there first, which is a useful operational habit. If the route shows up, gather the key details before escalating anything: source network, destination network, transaction hash, and wallet address. That turns a vague support complaint into a solvable case.
If the asset still does not appear as expected, verify the obvious wallet-side issues too. Are you looking at the correct chain? Did the route really support the token you sent? Is the amount large enough to make sense after fees? Most bridge confusion gets easier once you separate protocol failure from wallet visibility and route misunderstanding.
Helpful next reads on DEXTools
Frequently Asked Questions
What is Orbiter Finance mainly used for?
It is mainly used for cross-rollup and layer-2 oriented transfers where speed, cost efficiency, and route simplicity matter.
Is Orbiter good for L2 to L2 bridging?
Yes, that is one of its most obvious use cases and one reason the product stands out in search.
How fast are Orbiter transfers?
Orbiter’s docs emphasize speed, but the actual timing still depends on route conditions and network behavior.
What should I do if an Orbiter transaction looks stuck?
Check History first, collect the route details and transaction hash, then verify wallet-side visibility before escalating.
What is the safest way to use Orbiter for the first time?
Use a small amount, confirm the route slowly, and make sure the destination side will be usable when the funds arrive.
Do I need gas on the destination chain when using Orbiter?
In practical terms, yes. Even if the bridge succeeds, the destination side is more useful when you can immediately interact with the wallet and do the next required action.
What should I check first if an Orbiter transfer feels wrong?
Start with the destination chain, token visibility, transaction history, and route details before assuming the bridge itself failed.
Related reading
Disclaimer: This article is for educational purposes only and not financial, legal, or tax advice. Supported networks, route quality, and fees can change. Always confirm the live route before bridging funds.
Related Guides
- What Is Crypto Bridge Slippage? Why Cross-Chain Transfers Drift (2026)
- What Is Bridge Risk in Crypto? Complete Beginner Guide (2026)
- What Is Bridge Confirmation Time? Crypto Guide 2026
- What Is a Bridge Aggregator in Crypto? Complete Beginner Guide (2026)
- What Are Bridge Fees in Crypto? Cost Breakdown, Quotes and Hidden Charges (2026)