How to Use Keplr Wallet: Beginner Guide (2026)
— By Tony Rabbit in Tutorials
Learn how to use Keplr Wallet safely in 2026: setup, backup, funding, staking basics, app connections, and the main beginner mistakes to avoid.
Keplr Wallet is one of the main self-custody wallets users encounter when they want direct access to multichain assets, app connections, and staking flows outside centralized exchanges. It is popular because it makes cross-chain wallet management feel smoother than the old fragmented setup many users remember from earlier crypto cycles.
This guide is built around the exact beginner intent behind the query how to use Keplr Wallet. The real goal is not just opening the wallet. It is setting it up safely, backing it up properly, funding it without mistakes, and understanding the first security decisions before you start signing things or moving real size.
Quick answer
- Install Keplr Wallet only from official sources and verify the app or extension before you create anything.
- Back up your recovery phrase before funding the wallet with any meaningful amount.
- Before staking or connecting to apps, confirm the chain, the permission request, and what you are actually signing.
What Is Keplr Wallet?
Keplr is a self-custody wallet used to manage assets, interact with apps, and participate in on-chain activity directly from your own wallet environment. In plain language, it lets you hold and use your own funds rather than leaving everything inside an exchange account.
The important part is not the wallet branding. The important part is the custody model. When you use a self-custody wallet, you gain more control, but you also take on more responsibility. If you lose your backup, approve a bad transaction, or send funds to the wrong destination, there is no exchange support desk that can always reverse it later.
Keplr Wallet vs exchange account
Keplr setup flow
Step 1: Install Keplr Wallet Safely
Use only the official Keplr site or official app-store style sources. Fake wallet pages and lookalike extensions still catch users who rush this step. If the page, extension listing, or install flow feels even slightly off, stop and verify before you continue.
The first install is where a lot of people think the hard part is already over. It is not. Installation is just the beginning. The real risk starts when users assume every wallet screen is trustworthy by default and stop checking what they downloaded.
Before you install
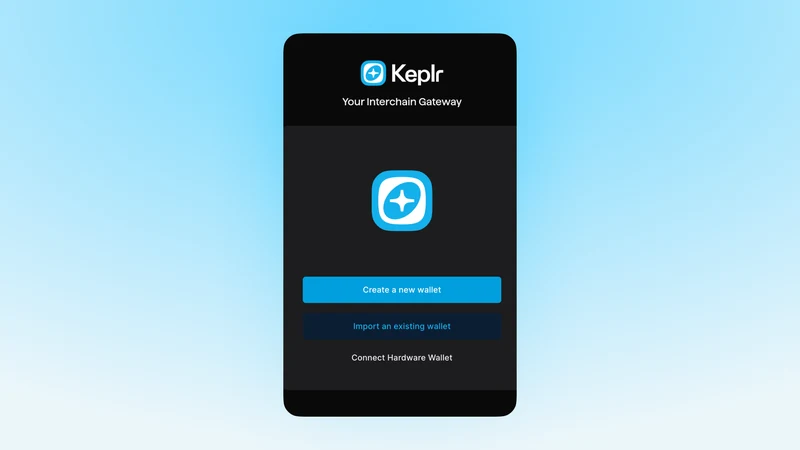
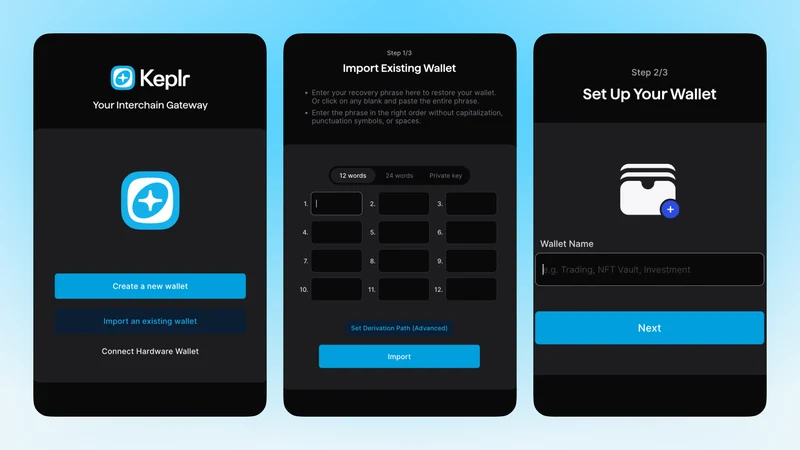
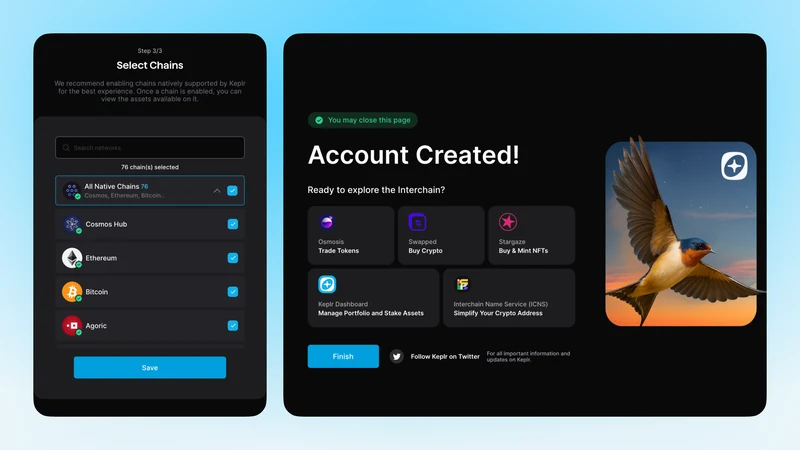
Step 2: Create a New Wallet or Import an Existing One
If you are starting from zero, creating a new wallet is usually the cleanest path. If you already have a compatible recovery phrase and you know exactly what it controls, importing can make sense. The more important issue is not new versus import. It is whether you understand the security implications of the choice you are making.
New users sometimes think importing is a shortcut to skip setup. That is not really true. Importing brings old history, old assumptions, and old risk into the new environment. A fresh wallet is often easier to reason about if the goal is clean organization and a safer starting point.
Step 3: Back Up Your Recovery Phrase Before You Fund Anything
This is the step that decides whether you actually control the wallet or are just temporarily using it. A self-custody wallet without a reliable backup is not really under control yet. If the device is lost, broken, wiped, or compromised, recovery depends on the backup discipline you put in place now.
The safest habit is still boring and effective: record the recovery phrase offline, store it deliberately, and do not scatter it across screenshots, cloud notes, or chat messages. Most wallet disasters do not begin with advanced attacks. They begin with ordinary sloppiness.
Keplr Wallet security checklist
Step 4: Fund Keplr Wallet Carefully
You can usually fund Keplr by receiving assets from another wallet or from an exchange. If this is the first transfer into the wallet, keep it simple. Copy the receive address directly from Keplr, verify the asset and chain, and use a small test amount before moving anything meaningful.
This is where many users create avoidable problems. They focus only on the address, while the real decision is address plus asset plus chain together. If one of those three is wrong, the transfer can still become confusing or expensive even when the address itself looked correct.
Step 5: Use Staking and App Connections Carefully
Keplr becomes much more useful when you start staking, connecting to apps, and managing on-chain activity from the wallet. That is also where wallet risk increases. Never treat wallet approvals like meaningless pop-ups. Read what you are signing and understand what permission or action the prompt is actually requesting.
Beginners often assume a wallet confirmation is just technical noise. It is not. Those prompts are where permissions get granted and actions become final. The best mindset is simple: if you do not understand what a signature is doing, do not approve it yet.
Before you connect Keplr to any app
Common Keplr Wallet Mistakes to Avoid
Frequently Asked Questions
Is Keplr Wallet a self-custody wallet?
Yes. Keplr is a self-custody wallet, which means you control the wallet access and backup. That also means you are responsible for security, recovery, and what you approve.
Can beginners use Keplr Wallet?
Yes, but beginners should slow down at setup, recovery phrase backup, and wallet permissions. The wallet is easy to start with, but self-custody still requires discipline.
What is Keplr Wallet mainly used for?
Keplr is mainly used for holding assets, connecting to apps, staking, managing multichain activity, and moving funds into self-custody from exchanges or other wallets.
What is the safest way to fund Keplr Wallet?
Usually by copying the receive address directly from Keplr and sending a small test amount first before moving anything larger.
Should I use Keplr Wallet for staking and app connections right away?
Only after you finish the basic setup properly. Back up the wallet first, fund it carefully, and understand what you are signing before you connect it to apps.
Related reading
Disclaimer: This article is for educational purposes only and does not constitute investment, tax, or legal advice. Wallet features, supported chains, staking flows, and app connections can change over time. Always verify the live interface before making important transactions.